TSG Little Moments Blog Hop!!

Wednesday, December 28, 2011

Welcome to the second and last blog hop of the There She Goes January Releases!

Warm fuzzy moments and life’s little memories are genuinely captured by Torico in this new Little Moments set. Gazing through the window watching the snow fall, special moments with brothers and sisters or wonderful thoughts of that one special grandmother that make your heart warm are all here. There’s no better
way to send a loving card or create a scrapbook page to capture these glorious moments than to use this fabulous new stamp set.

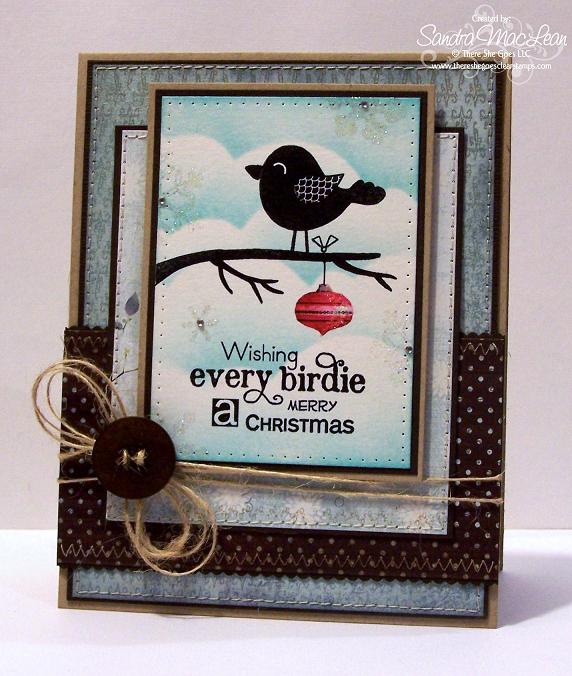
Little Moments is a 6x8 set that includes a total of 12 stamps $24.

There are some classic 'Torico' images in this set (which we all love to bits!) but I decided to use some of the images that doesn't immediately scream her name, but I love it just as much!

We haven't had much of a white Christmas here in New England (and that's A-OK!) but one of my favorite things about this area is that when the snow falls, it feels like I'm living in a snow globe! And usually I stop to watch that amazing view. It's my little moment. :)

I wanted to make the scene stand out, so I created a warm and cosy card with lots of dark colors so the snow and image would stand out. So I picked out some papers from Basic Grey's Jovial Collection, cut the shapes I needed, sponged the edges with Distress Inks and machine stitched it to some black cardstock. Then I colored up the image with my SU reinkers and aquapainter brush. Once that was dry, I cut it out with my precision scissors, popped it on dimensionals and added some glaze and sparkles with my Sakura pens. Lastly, I turned one of the beautiful sentiments in the set into a banner and pinned it to the card with a button from PTI and some jute button twine. And that's it - a warm and cosy card for a special friend!


Would you like to win the new Little Moments stamp set? Here is what you need to do- visit the Trendsetter’s blogs that are participating in each of the blog hop challenges below and comment on their creations as you go. One of the Trendsetter’s blogs (from each hop day) will be randomly chosen as the ‘it’ blog and a winner will be picked using a random number generator from the comments left on that Trendsetter’s Blog Hop Challenge post. You will not know which blog has been chosen so the more you comment on the better your chances are of winning new stamps! The Blog Hop Challenges will be open until 5 PM Eastern Time Saturday December 31st with the winner being announced during the release party chat.


Thanks so much for stopping by this week!! And see you at the release!


Supplies
Stamps: There She Goes 'Little Moments'
Inks: StazOn 'Jet Black', SU's Cool Caribbean, Creamy Caramel, Going Gray, Old Olive, Dusty Durango, Regal Rose, Ruby Red
Papers: Georgia Pacific, PTI Kraft Cardstock, Bazzil Basics, PP - Basic Grey's Jovial Collection
Access: Spellbinders Labels Eight Nestie, PTI Button - Black, PTI-Rustic Button Twine - Jute, Sakura Glaze Pens- Clear and Glitter, Machine Stitching, Sponges, Dimensionals

TSG Love Bots Release Blog Hop!!

Tuesday, December 27, 2011

Can it be that time already?! Absolutely!

Welcome to the first of the There She Goes January release blog hop!!!

If you loved Friendbots, you’re going to love Lovebots. With Valentine’s Day around the corner, Torico has created an adorable set that will have your heart
bursting with joy. This adorable mini set will have your creating cards and gift tags that carry your message of love and friendship to all your special Valentines.

Lovebots is a 4x4 set that includes a total of 7 stamps $10.

Torico's done it again! I am head over heels in love with this little 'bot and his friends! And this month he's bursting with love! Perfect for Valentines Day cards for those men in our lives!

I use the main image from the set to whip this card up. The base was made by sponging and distressing a piece of patterned paper from Basic Grey's Nook and Pantry paper. Then I cut two strips of coordinating paper from October Afternoon's Farm Fresh collection with my small scalloped scissors. I sponged them with some Distress Ink and decorated it with some of PTI's Bakers Twine in red and one of my coverted heart buttons from Michaels! The sentiment was cut out with a Labels Eight Nestie, sponged and tucked behind the horizontal strip. Add a little stitching with some embroidery thread and it's all done!


This was another quick and easy card using the other image from this set. He was too cute not to color up! Again, I colored him up with my reinkers and aquapainter brush. Then I used some more scrap paper from Basic Grey's Nook and Panty line for the vertical stripe down the middle. I used PTI's Half and Half die to create the stripe. Spellbinders Oval Nestie, some more scrap paper from Bo Bunnies Dot on Dot Collection and some Bazzil Basics cardstock created the oval panel. I used a brown pen to draw the line around the edge. The base of the card was made with some left over paper from MME and running my sewing machine around the edge with no thread in it. Last, I added some buttons, ribbon and another sentiment from the new set. Easy peesy!

Would you like to win the new Lovebots stamp set? Here is what you need to do- visit the Trendsetter’s blogs that are participating in each of the blog hop challenges below and comment on their creations as you go. One of the Trendsetter’s blogs (from each hop day) will be randomly chosen as the ‘it’ blog and a winner will be picked using a random number generator from the comments left on that Trendsetter’s Blog Hop Challenge post. You will not know which blog has been chosen so the more you comment on the better your chances are of winning new stamps! The Blog Hop Challenges will be open until 5 PM Eastern Time Saturday December 31st with the winner being announced during the release party chat.


Supplies
"My Heart Bursts..."
Stamps: There She Goes 'LoveBots'
Inks: StazOn 'Jet Black', Going Gray, Baha Breeze, Regal Rose, Ruby Red, Distress Ink 'Antique Linen and Tea Dye'
Papers: Georgia Pacific, PTI Kraft Cardstock, PP - Basic Grey 'Nook and Pantry' and 'October Afternoon's 'Farm Fresh'
Access: PTI Bakers Twine, Fiskars Decorative Scissors, Heart Button - Michaels, Machine Stitching, Dimensionals, Sponges

"My Love For You..."
Stamps: There She Goes 'LoveBots'
Inks: StazOn 'Jet Black', Going Gray, Soft Sky, Regal Rose, Ruby Red, Distress Ink 'Antique Linen and Tea Dye'
Papers: Georgia Pacific, PTI Kraft Cardstock, Bazzil Basics, PP - Basic Grey 'Nook and Pantry', Bo Bunny and MME scrap

Access: Ribbon, PTI Button - Brown, PTI Half and Half Dies, Spellbinders Oval and Scalloped Oval Nesties, Heart Button - Michaels, Machine Stitching, Dimensionals, Sponges

Wanna Take A Spin??

Friday, December 23, 2011

Happy Friday Everyone!

Are you ready for Christmas?? I managed to free up some time last night and put a small dent in our Christmas shopping list, but tonight's the grand finale for us. The Man and I are headed to the Mall after work. The closest mall to us is 1.5hrs away (yes, I live in the sticks) so we need our game on and eye on the prize(s) to get it done before closing time! Wish us luck!

Next week is release week for There She Goes and I'm sure it'll be like Christmas all over again! But before we show you a whole new bunch of stamps, we like to revisit some oldie but goodie stamp sets. It's a little something we like to call There She Goes (Again!)! This week's sets are Love Birds, Garden of Friends and Loads of Fun. This week, the Senior Trensetters have shared some old cards with you and today we've whipped up some new ones to share with you!


I chose the hilarious set, Loads of Fun! If you've never read any of the sentiments on this set, you need to! They're all puns on the mundane chore of laundry and they crack me up!


To make this card, I used last week's Deconstructing Sketch #31 (I'm about a week late!) for my layout, some paper from Crate Paper and some bling because even laundry needs some extra sparkle! ;)


I colored the machines in with some of SU's Soft Sky with my aquapainter brush, then I trimmed the cardstock, sponged the edges with Antique Linen distress ink and matted it to some Bitter Chocolate cardstock from Bazzil Basics. The patterned paper is from Crate Paper. I pretty much followed the sketch to a T, but kept the papers to a minimum - especially since they were so bold! Each layer was machine stitched to some Bazzil cardstock. The small scalloped edge was done with decorative scissors. The rhinestones were added, some embroidery floss was added to the center button and I created a banner for the sentiment to balance out the buttons on the top.

I hope I've inspired you to break out your older sets and create something new and fun!


Thanks so much for stopping by today! I'm off to battle the last minute shoppers and wrap till I can't wrap no more! If I don't get back here before the big day, I just want to with you and your family a very Merry Christmas!!


MERRY CHRISTMAS EVERYONE!


Supplies

Stamps: There She Goes 'Loads Of Fun'

Inks: StazOn 'Jet Black', SU's Soft Sky, Going Gray, More Mustard, Regal Rose, Old Olive, Distress Inks 'Antique Linen and Tea Dye'

Papers: Strathmore Bristol Vellum, Bazzil Basics - Bitter Chocolate, PTI's Kraft Cardstock, PP - Crate Paper

Access: PTI Buttons - Brown, DMC Thread, Adhesive Rhinestones, Fiskars Decorative Scissors, Sponges, Machine Stitching Dimensionals

Christmas Cookies Recipes!

Thursday, December 22, 2011

Hi there!


I'm so sorry I've been absent lately. With Christmas right around the corner, working full time and all the things that go with the holidays, I haven't had time for much else this week. I've also been working on a Christmas present that takes up all of my spare time. I'll share it with you after the holidays.


But as promised, I'm back with some more Christmas Cookie recipes! I tested these two out this past weekend and they were both a hit at the cookie swap. (The pistachio one, especially!)


Pistachio-Cranberry Cookies

Ingredients
Betty Crocker Sugar Cookie Mix
1 box (4 serving size) pistachio instant pudding and pie filling mix
1/4 cup flour
1/2 cup butter, melted
2 eggs
1 cup dry roasted salted pistachio nuts, chopped
1/2 cup dried cranberries, chopped
Optional - green food coloring


Directions
Preheat oven to 350 degrees.

In a large bowl stir cookie mix, pudding, and flour. Add melted butter and eggs and stir until incorporated.

Add pistachios and cranberries and mix well.
Drop by rounded spoonfuls onto a parchment lined cookie sheet.
Bake for 8-10 minutes. The only way you can ruin these cookies is to overbake them! If you bake them too long you will lose the soft texture and they won't be as green. They will not look done but take them out and let them sit on the pan for about 2 minutes.

Cool on a wire rack. Store in an airtight container. Makes about 2 dozen cookies.


~~~~~~~~~~~~~~~~~~~~~~~~~~~~~~~~


Philadelphia S'More Sandwich Cookies

Ingredients
1 pkg. (8 oz.) PHILADELPHIA Cream Cheese, softened
1 cup (2 sticks) butter, softened
2/3 cup granulated sugar
1/4 tsp. vanilla
2-1/2 cups flour
1/2 cup colored sugar


Directions
BEAT cream cheese and butter in large bowl with electric mixer until well blended. Add granulated sugar and vanilla; mix well. Gradually add flour, beating well after each addition; cover. Refrigerate several hours or until chilled.


PREHEAT oven to 350°F. Roll out dough to 1/8-inch thickness on lightly floured surface. Cut into shapes with 2-inch cookie cutters. Sprinkle half of the cookies with colored sugar. Place, 2 inches apart, on baking sheets.


BAKE 12 mins or until edges are lightly browned. Cool on baking sheets 1 min. Remove to wire racks; cool completely.

SPREAD bottom side of each plain cookies with 1 tsp. Jet Puffed Marshmallow Crème; cover with remaining sugared cookies, bottom-sides down, to form sandwiches.

DRIZZLE with 2 squares of Bake’s Semi Sweet Baking Chocolate, melted.


Enjoy!

Gingerbread Men and Amazing Snickerdoodles!

Friday, December 16, 2011

Hi everyone!


I'm back with a couple of my favorite Christmas cookie recipes!


I'm in the middle of a baking frenzy right now and these two recipes are my always on my cookie swap list! I think I stumbled on the Gingerbread Men recipe years ago while looking for something to bake with my little girl. These are more spicier than your average gingerbread man cookie, but that's the way I like my ginger men! ;)

I've probably made the Snickerdoodle recipe about a thousand times over the past two years. My family raves about them and The Man even asked me to whip up a batch for his work collegues! They never last more than a few days in our house, so you know they have to be good! :)


I hope you enjoy them just as much as we do!


Eileen's Spicy Gingerbread Men

Ingredients:
1/2 cup margarine
1/2 cup sugar
1/2 cup molasses
1 egg yolk
2 cups sifted all-purpose flour
1/2 teaspoon salt
1/2 teaspoon baking powder
1/2 teaspoon baking soda
1/2 teaspoon ground cinnamon
1 teaspoon ground cloves
1 teaspoon ginger
1/2 teaspoon ground nutmeg


Directions:
1. In a large bowl, cream together the margarine and sugar until smooth. Stir in molasses and egg yolk. Combine the flour, salt, baking powder, baking soda, cinnamon, cloves, ginger, and nutmeg; blend into the molasses mixture until smooth. Cover, and chill for at least one hour.

2. Preheat the oven to 350 degrees F (175 degrees C). On a lightly floured surface, roll the dough out to 1/4 inch thickness. Cut into desired shapes with cookie cutters. Place cookies 2 inches apart on ungreased cookie sheets.

3. Bake for 8 to 10 minutes in the preheated oven, until firm. Remove from cookie sheets to cool on wire racks. Frost or decorate when cool.

~~~~~~~~~~~~~~~~~~~~~~~~~~~~~~~~~~~~


Yields: about 30 cookies


Ingredients:

2 1/4 cups (11 1/4 oz.) unbleached all-purpose flour

2 tsp. cream of tartar

1 tsp. baking soda

1/2 tsp. salt

12 tbsp. unsalted butter, softened but still cool

1/4 cup vegetable shortening

1 1/2 cups (10 1/2 oz.) granulated sugar,

plus 3 tbsp. for rolling dough

2 large eggs
1 tbsp. ground cinnamon, for rolling dough


Directions:

1. Adjust oven racks to upper- and lower-middle positions. Preheat the oven to 400 degrees F. Line baking sheets with parchment paper. In a medium bowl, whisk together the flour, cream of tartar, baking soda and salt; set aside. In the bowl of an electric mixer fitted with the paddle attachment, cream the butter, shortening and 1 1/2 cups sugar on medium speed until well combined, 1 to 1 1/2 minutes. Scrape down the sides of the bowl, add the eggs, and beat again until combined, about 30 seconds. Add in the dry ingredients and beat at low speed until just combined, about 20 seconds.


2. In a small, shallow bowl, combine the 3 tablespoons sugar and the cinnamon for rolling the dough. Stir or shake well to combine. Working with a heaping tablespoon of dough each time, roll the dough into 1 1/2-inch balls. Roll the balls in the cinnamon sugar mixture and place them on the prepared baking sheets, about 2 inches apart. Use a drinking glass with a flat bottom to gently flatten the dough balls to 3/4-inch thickness (butter the bottom of the glass before starting, and dip it in sugar between cookies if it begins to stick).


3. Bake until the edges of the cookies are beginning to set and the center are soft and puffy, 9-11 minutes, rotating the baking sheets front to back and top to bottom halfway through the baking time. Let the cookies cool on the baking sheets 2-3 minutes before transferring them to a wire rack to cool completely.


This weekend I'm baking Chewy Lemon Snowdrop cookies, Oreo Bark, Peanut Brittle, Soft Molasses cookies dipped in white chocolate! If you want me to share any of these recipes just let me know!


Have a great weekend!!

Wishing You Sparkle!

Thursday, December 15, 2011

Happy Wednesday Everyone!


So I did do some baking over the weekend, but not as much as I thought I was going to do. We detoured from the plan a little. Every year, around this time we like to head to the Yankee Candle factory (in Deerfield, MA) and we hadn't done it yet, so we took an impromptu trip out there last Saturday afternoon. They pull out all the stops for the holidays - every building is edge with twinkle lights and each room is fulled with festive music, lots of glitter and twinkle and as you can imagine, it smells like heaven! Ahhh..I'd love to work there!


This visit inspired me to pull out one of my favorite There She Goes Christmas sets and whip up a card with sparkle, glitter and a little bit of Santa!


I love the Season's Greetings set because of it's cute snowmen and whimsical Santas'! To start with, I colored up Santa using my reinkers from Stamping Up and my aquapainter brush. I used a combination of Regal Rose and Ruby Red for his coat and hat and some Going Gray for the shadows on his beard and trim. Then I cut him out with my precision scissors and added some Crystal Snow glitter to his body and the Christmas tree. Then, to make the card, I used Karen's Sweet Sunday Sketch #147 for my inspiration and some more yummy paper from Basic Grey's Jovial Collection. Instead of ribbon, I chose to use some black lace. What do you think - maybe a little racy for dear old Santa?! Lace doesn't always have to be sexy does it? I needed something a little transparent, so I went with it. I pulled it all together with a button and jute twine from PTI. My other favorite thing about this set is the sentiments - I adore this one!


I promised I'd share a couple of my favorite cookie recipes with you all, so be on the look out for them tomorrow! Until then, have a good one!


Supplies
Stamps: There She Goes
'Seasons Greetings'
Inks: StazOn 'Jet Black', SU's Regal Rose, Ruby Red, Going Gray, Old Olive, Morning Marigold and Distress Inks 'Tea Dye and Vintage Photo'
Papers: Strathmore Bristol Vellum,
PTI Black and Kraft Cardstock, PP - Basic Grey's Jovial Collection
Access: PTI Button - Black, PTI Rustic Button Twine, Lace, Quickie Glue Pen, Stampendous Crystal Snow Glitter, Machine Stitching, Dimensionals

Ho Ho Ho!

Friday, December 9, 2011

Happy Friday Everyone!


Well, this week didn't go as I had planned. I meant to make this card over the weekend and have it ready to show you by Tuesday, but as usual lately, life got in the way again and I barely made it into my craft room! Saturday was spent getting new tires for my truck (yay - no more loud road noise!) and we got our fresh Christmas tree. So the rest of the day was spent decorating it while sipping on hot chocolate. I probably could have spent some time stamping on Sunday, but the laundry and unfinished house projects beckoned. Home ownership has it's downsides too. ;)

I'm not going to lie to you...this card took me all week to complete! A half hour here, a half hour there! I have been feeling like my mojo has gone AWOL for months now, so I was hesitant to spend hours in my craft room getting no where. But, I think it might be back this week because this card isn't half bad! Nothing like a new stamp set to get the juices flowing again, right?! ;)


The only stamp set that managed to arrive at my house from the last There She Goes release was the little Ho Ho Ho mini set. But it was all I needed to play with! I paired it with Karen's Sweet Sunday Sketch Challenge #146, some non-Christmas paper from October Afternoon's Modern Homemaker line and before you know it, I had a cute Christmas card on my hands! Wahooo! As with all my cards, Mr. Claus and Rudolf were colored with my SU reinkers and aquapainter brush. If you're like me and Copic's are out of your crafting budget, a drop of water and a little bit of ink go a long way to creating the same effect!


Any plans for the weekend? I am hoping to bake all weekend! I want to take some cookies over to our nice neighbors and take some to work next week. I'm trying out some new recipes too, so if they turn out well, I'll share them with you!


Have a great weekend sweet friends! And thanks for stopping by!


Supplies
Stamps:
There She Goes
'Ho Ho Ho' mini set

Inks: StazOn 'Jet Black', SU's Creamy Caramel, Regal Rose, Ruby Red, Going Gray, Curry Crush, Sahara Sand and Soft Sky, Distress Inks 'Antique Linen and Tea Dye'

Papers: Strathmore Bristol Vellum, PTI Black and Kraft Cardstock, PP - October Afternoon's Modern Homemaker collection

Access: Spellbinders Circle Nesties, Fiskars Corner Punch, PTI Bakers Twine - Red, PTI Button - White, Machine Stitching, Paper Piercer, Sponges, Dimensionals

Seasons Greetings!

Friday, December 2, 2011

How on earth did December get here so fast?!

I was just getting around to enjoying the Fall weather (after our very early snow fall) and then....WHAM!! It's December! And Christmas is around right around the corner! Eek! We usually have our Christmas tree picked out, chopped down and decorated by now, but it was unseasonably warm the weekend after Thanksgiving that I couldn't bare the thought of decorating for the new season. Now that it's a little colder and it IS December, we're heading out to get our tree this weekend. Even though it still feels too early, I do love this family tradition! :)

Oh! Before I forget; I'm so sorry for not posting anything last week! It was actually release week for There She Goes but unfortunately my stamps never arrived (darn USPS!), so I was unable to participate. I was so disappointed that it put me in a little funk because it was such a FABULOUS release! The girls did an awesome job of showcasing the new stamps that they sold out of every new set! Hopefully mine turn up soon so I can play with them too!

Since I don't have any new stamps to play with, I pulled out one of my favorite past sets this week.


I just love those pudgy snowmen!! So round and plump! They can be found in the Seasons Greetings set. I used last week's Deconstructing Sketch #28 for my layout. I'm a little late on this one but that's ok, it's all about being inspired, right? :)

To make this card I used paper from Basic Grey's Jovial collection and some gorgeous ribbon that I found at Michaels last year, which I've been hoarding ever since! Each panel was machine stitched with black thread. To create that scalloped detail, I used my corner punch with the guard removed to punch out the large scallops, then with my small scalloped decorative scissors, I followed the larger scallops around leaving about a 1/8" border showing.

Coloring the little snowmen was easy. Using my aquapainter brush, I used a combination of Distress Inks, working my way from the lightest color, Antique Linen, then Tea Dye then a little Vintage Photo for the darkest of shadows. Their hats and mittens were colored using SU's Dusty Durango and their scarves in Old Olive. The hearts were done in Regal Rose and then Ruby Red around the edges. Then I outlined them with SU's Soft Sky and sponged the edges with Antique Linen for a softer look. Last, but not least, I added some Crystal Snow glitter with a quickie glue pen. You can see the tiny twinkles in the detail photo below.


You should see how they sparkle in real life!


Thank you so much for popping in this week. I so appreciate it!


Supplies
Stamps: There She Goes 'Seasons Greetings'
Inks: StazOn 'Jet Black', Distress Ink 'Antique Linen, Tea Dye and Vintage Photo', SU's Soft Sky, Regal Rose, Ruby Red, Old Olive and Dusty Durango'
Papers: Strathmore Bristol Vellum, PTI's Basic Black and Kraft, PP-Basic Grey's Jovial Collection
Access: Ribbon, PTI Buttons - Cream, Fiskars Corner Punch and Decorative Scissors, Stampendous Crystal Snow Glitter, Quickie Glue Pen, Machine Stitching, Sponges, Dimensionals

Happy Bird Day!

Friday, November 18, 2011

And a happy Friday to everyone too!

I've been busy taking training classes in some new software for work all week, and my poor brain is fried! Today's the last day of the training, and it's actually a lot of fun (I love being exposed to new things!) but I desperately needed a creative outlet! So I whipped up another card using the Birdie Wishes set from There She Goes again!

One of my favorite things about the There She Goes sets is that there are always a bunch of sentiments that you can choose from. The sets are so versatile and this one is no different! It has sentiments and images for Christmas cards (like I showed you on Tuesday) and for birthdays. It just so happens that I needed to make a birthday card for my sweet friend Mary, so I paired the Birdie Wishes set with some paper (that Mary gifted me!) from Crate Paper to create this simple card for her. Hopefully I can get out of classes early today to make it to the Post Office in time!

There are three older sets that are being showcased this week over at the TSG blog. Those sets are Penguin Love, Stick Together and....yep! You guessed it - Birdie Wishes! Today, the senior Trendies from the design team have created a whole bunch new cards using these sets for you to drool over, so I suggesting booking over to the TSG blog for a gander as soon as you can! :)

Thanks so much for stopping by this week! I hope you all have a lovely weekend - I plan on resting, and stamping!


Supplies
Stamps: There She Goes 'Birdie Wishes'
Inks: StazOn 'Jet Black', Distress Inks 'Frayed Burlap'
Papers: PTI Kraft Cardstock, Bazzil Basics - Bitter Chocolate', PP - Crate Paper
Access: PTI Beautiful Blooms II Die, Spellbinders Labels Six Nesties, Martha Stewart Edge Punch, Paper Piercer, Basic Grey Brads-Jovial, Fiskars Decorative Scissors, PTI Rustic Button Twine, Cream Button, Machine Stitching, Sponges, Dimensionals

Wishing Every Birdie...

Tuesday, November 15, 2011

Good Morning!

Now that it has stopped snowing and raining around the New England area, we can get back to doing our Fall chores! We have a few 100 year old maple trees on our property, so you can imagine the amount of leaves they shed every year. It's a lot! This past weekend was all about raking them up, cutting back the wildflowers, mowing the lawn one last time and generally cleaning up before Winter hits. Every muscle in my body aches right now! Too much work in a short space of time. But it had to be done because who knows if we'll get a chance to tackle it again - this crazy New England weather has a mind of it's own these days!

One thing I did do over the weekend that was fun was make a card for this week's There She Goes Challenge #130. It's a recipe challenge this week and one that I think you'll like! Jessica is challenging you to create a card using a bird, a snowflake (it must have both images) and at least one kind of ribbon or button.

Not a hard recipe right? It's really easy if you have two sets particular sets from There She Goes! I used the cute little bird from Birdie Wishes and those almost transparent snowflakes were from the Stick Together mini set. I borrowed the layout from this month's Sketch For You To Try and the paper is from Memory Box.

I created the irridescent snowflakes using some Versamark Ink and some Crystal Snow Embossing Powder from Stampendous. Then I added some Crystal Twinkles to the center of the snowflakes to make them stand out a little.


To be eligible for the giveaway, you are to create a card using the recipe, and then come back to the TSG Blog to add your name and a link to your project in the InLinkz that is located at the bottom of the challenge post. This challenge is open until the winner has been announced on the following Monday (November 21st). The winner will get a $5 gift certificate to use in the TSG Web store!

By participating in this challenge, you may also find yourself in the Trendsetting Spotlight that shines on the TSG Blog every Thursday. We will be on the look out to find challenge cards that stand out and show Trendsetting qualities. TSG stamps are not required to participate in the challenges but are appreciated :)

You do not need to have a blog to be able to participate in the TSG Challenges! You can simply add the URL link from your project after it has been uploaded to your online craft gallery. If you upload your card to an online craft gallery, please use the keyword TSG130 so we can check out your beautiful work!


Thank you so very much for stopping in today! Check back in on Friday - I feel a redo coming on! ;)


Supplies

Stamps: There She Goes 'Birdie Wishes' and 'Stick Together'

Inks: StazOn 'Jet Black', SU's Cool Caribbean and Real Red, Versamark

Papers: PTI Kraft Cardstock, Bazzil Basics - Bitter Chocolate, PP - Memory Box

Access: PTI Rustic Button Twine, PTI Button-Brown, Stampendous Kaliedescope Embossing Powder, Crystal Twinkles, Fiskars Decorative Scissors, Sponges, Machine Stitching, Dimensionals

Warming The Heart

Tuesday, November 8, 2011

Good Morning!

I hope you all had a great weekend. I really didn't do much, but that was OK with me. Especially after last weekend's efforts! :) I have a hard time getting myself off the couch lately. I think it's a combination of our deep, comfy couch and the wood stove! But even though I'm 'vegging' out, I still manage to stay somewhat productive. I've been working on another cross stitch, which keeps my hands busy when I'm watching TV. I never just sit still. Just can't do it!

So I didn't get much done over the weekend, but I did work on a card last night. This week, There She Goes is sponsoring the Tuesday Morning Sketches challenge, and I love a good sketch!


Since it's getting colder around these parts, I pulled out the Wonderful Winter Wishes set, some fun patterned paper and whipped up this cozy little card! These colors aren't your typical winter colors, but I thought the season needed a little warming up! Actually, I was inspired by a card I did a long, long, long time ago! Have you ever gone back to look at the cards you did when you first started stamping? I almost shudder at those now, but I love to see how my style has evolved!


I created the base using some paper from Crate Paper's Snow Day Collection. I used the largest Labels 8 Nestie to create the cut out down the right hand side. Then I matted the left hand piece of patterned paper with some white cardstock and used my decorative scissors to create the border. Next I matted the two pieces to some Bitter Chocolate cardstock and machine stitched them together. The horizontal strip was done with a Labels 4 Nestie and the same decorative scissors. The cute little kids from the Wonderful Winter Wishes set were colored with my reinkers and aquapainter brush, then I sponged the edges of the panel with some Antique Linen Distress Ink. Lastly, I added the ribbon and some tiny crystal twinkles to finish it off.

If you'd like to play along with this week's Tuesday Morning Sketch Challenge, then head over to their blog for all the details and give it a go!

Thanks so much for stopping in today!


Supplies
Stamps:
There She Goes
'Wonderful Winter Wishes'
Inks: Staz On 'Jet Black', Distress Inks 'Antique Linen'
Papers: Strathmore Bristol Vellum, PTI Kraft Cardstock, Georgia Pacific, Bazzil Basics - Bitter Chocolate, PP - Crate Paper "
Snow Day Collection"
Access:
Spellbinders Labels Four Nestie, Spellbinder Labels Eight Nestie, Fiskars Decorative Scissors, Crystal Twinkles , Ribbon, Machine Stitching, Sponges, Dimensionals

Hi Friend!

Friday, November 4, 2011

Happy Friday Everyone!

I came down with a cold last weekend, which I tried to ignore because I had a bunch of things on my to-do list that needed to get done. I spent most of Sunday doing a grocery run, laundry, hemming pants and baked about 100 cookies! The Man wanted to take some of my Snickerdoodle cookies to work since he'd raved about them, and the Little Ray of Sunshine had a Halloween party on Monday, so I had to make some ghost-shaped sugar cookies for the treat bags. I also ended up making some Mummie Dogs for the party. All of which pretty much wiped me out! So the last thing I felt like doing was staying up late in my craft room sneezing all over my paper! Ewww!

But I did feel a little better yesterday so I made this card for you!


One of my favorite sets from the recent There She Goes release is the cute, little
FriendBot set! I have a bit of a thing for robot images and Torico really knows how to play up their cute factor!

I started this card by cutting a piece of PTI kraft cardstock to a standard 4.25"x5.5" size. Then I cut a piece of
Sassafras Lass 'Apple Jack' patterned paper for the base and matted it with some black cardstock. Next, I cut a smaller strip of another piece of coordinating paper and also matted it with black cardstock, but this time I used my small scalloped decorative scissors and trimmed the edge. The bingo piece was cut using a Labels 4 nestie and lightly sponged with Frayed Burlap Distress Ink. I punched the lined red paper with a corner punch and also matted it for more presence. Then I punched out a piece of graph paper from the same Sassafras Lass collection with my PTI eyelet lace border die and adhered it to the horizontal strip. Then I added the New Leaf Bakers Twine from PTI and tied it up with a button and a simple bow. Last, but not least, I colored up the two Bots with my SU reinkers, cut them out and popped them on the card with dimensionals.

If the layout looks familiar, you're absolutely right! It's this week's layout from Karen's
Sweet Sunday Sketch challenge #141. Love her layouts! :)


Thank you so much for stopping in today! Ooo! By the way, if you love TSG stamps, I will have a scrapbook page to share with you tomorrow on the TSG blog!

Supplies
Stamps: There She Goes
'FriendBots'
Inks: StazOn 'Jet Black', SU's Going Gray, More Marigold, Really Rust, Old Olive, Ruby Red, Regal Rose
Papers: Strathmore Bristol Vellum, Bazzil Basics,
PTI Kraft cardstock, PP - Sassafras Lass 'Apple Jack' Wee Bundle
Access: PTI Bakers Twine - New Leaf, Fiskars Decorative Scissors, Spellbinders Labels 4 Nestibilities, PTI Button - Black, PTI Eyelet Lace Border Die, Dimensionals

TSG No Peeking Release Blog Hop!!

Thursday, October 27, 2011

Welcome back to Day Three of the There She Goes November releases! As I said yesterday, we've saved the best for last this month! I know you guys are going to love this set just as much as I do!

Have you ever wanted to make a Christmas advent calendar, but never had enough stamps to make one?? Well now you do!


Kids love to countdown the days until Christmas is finally here and with this new set illustrated by Torico, you are going to have just as much fun creating a countdown advent calendar! With 25 different adorable holiday images and two sets of numbers the possibilities are endless! To make this set even more useable, there are two decorative circles and two decorative squares that were designed to be used with a 1 3/8" punch!

No Peeking! is a 6x8 set that includes a total of 53 (yes, you read right!) stamps and will sell for $24.


For those of you who have been following my Pinterest boards, you know I've been on an advent calendar kick lately. I've pinned all sorts of styles, but the onesI kept gravitating towards, were the magnetic ones created using a cookie sheet. Yep! Those metal pans are more useful than you think!

How cool is this?? My 6 year old even gave it 2 thumbs up! To make this calendar, I started by drilling two holes in the top of the pan to tie the ribbon through. If you don't have any drill bits, I'd tape it to the back of the pan. Next, I spray painted the pan white. (Tip: Lightly sand the pan before you spray it, otherwise it will chip easily - like mine! Nothing sticks to Teflon, right?!). Then I cut various papers to size and adhered them to the inside of the pan. (Tip: Trim each layer so that you only have one layer in the center of the pan, so the magnets on the individual pieces will still work through the paper.) Then I rummaged through my stockpile of alphabet stickers and found enough to create a title. Now for the fun part! I stamped out the 25 Christmas images, colored them in, then I cut each one out with my precision scissors. Trust me - it's much more fun when you're sitting in front of the tv for this part! :) Then I stamped a combination of the square and circle panels onto some scrap patterned paper and punched them out with my punches. Then it was just a matter of stacking them, adding the numbers and adhering the magnets to the back of them! (Tip: I used a big, old Red Sox game schedule magnet from past years to mount my pieces to the pan. I just cut it into 25 pieces! It's a cheap alternative to going out and buying a magnet and you're recycling in the process!)


Would you like to win the new No Peeking! stamp set? Here is what you need to do- visit the Trendsetter’s blogs that are participating in each of the blog hop challenges below and comment on their creations as you go. One of the Trendsetter’s blogs (from each hop day) will be randomly chosen as the ‘it’ blog and a winner will be picked using a random number generator from the comments left on that Trendsetter’s Blog Hop Challenge post. You will not know which blog has been chosen so the more you comment on the better your chances are of winning new stamps! The Blog Hop Challenges will be open until 5 PM Eastern Time Saturday October 29th with the winner being announced during the release party chat.

Here's the list of blogs you should definitely hit up!


Thank you so much for stopping by all week! Have a fantastic weekend!


Supplies
Stamps: There She Goes 'No Peeking'
Inks: StazOn 'Jet Black', various SU colors
Papers: Strathmore Bristol Vellum, Bazzil Basics, PP - My Minds Eye, Cosmo Cricket, Scenic River
Access: Adhesive Stickers, Fiskars Decorative Scissors, 1-3/8" Circle Punch, Dimensionals, Magnets

TSG Bon Appetit Release Blog Hop!!

Wednesday, October 26, 2011

Good Morning and welcome to Day Two of the November There She Goes releases!!

We've whipped up a fantastic set for you all today! (Pun intended!)


Here's another fabulous set from Torico – she’s showing off her range of creativity! Whip us some delicious greetings with the new Bon Appetit set. From the succulent turkey to steamin’ hot pie create some mouthwatering table settings and pass down secret family recipes for generations to come. Compliments of Chef Torico!

Bon Appétit is a 4x8 set that includes a total of 31 stamps and will sell for $18.

Way cute, right?? When Jess showed us this set, I squealed at the sight of this little chef guy! I love him! (Don't tell The Man that!) I decided that he needed his own space on a card, so I came up with this elongated layout especially for him. I used a piece of October Afternoon's Farm Fresh paper that I've been hoarding for a while for the base. It was matted with some dark brown cardstock as well as some white cardstock, which I trimmed using my Fiskars ecorative scissors. Then I punched out the tag using PTI's Half & Half die set and stamped the sentiment (also in the set) and the fork in black ink. Then I just sponged the edges with Antique Linen Distress Ink and matted it with some dark brown cardstock. (Tip: I use a pair of small precision scissors to cut around my Nesties and stamped images.)

The red gingham paper (also from the Farm Fresh paper collection) was trimmed with my pinking shears and dressed up with some red baking twine and a couple of buttons. Little chef guy was colored with my trusty aqua painter brush and SU reinkers.

Would you like to win the new Bon Appétit stamp set? Here is what you need to do- visit the Trendsetter’s blogs that are participating in each of the blog hop challenges below and comment on their creations as you go. One of the Trendsetter’s blogs (from each hop day) will be randomly chosen as the ‘it’ blog and a winner will be picked using a random number generator from the comments left on that Trendsetter’s Blog Hop Challenge post. You will not know which blog has been chosen so the more you comment on the better your chances are of winning new stamps! The Blog Hop Challenges will be open until 5 PM Eastern Time Saturday October 29th with the winner being announced during the release party chat.

Here's a list of all the blogs you should definitely hit!


Thank you again for stopping by today! We have one more sneak peek for you tomorrow, and we've saved the best for last!


Supplies
Stamps:
There She Goes 'Bon Appetit'
Inks: StazOn 'Jet Black', SU's Creamy Caramel, Going Gray, Ruby Red, Distress Inks 'Antique Linen, Black Soot'
Papers: Strathmore Bristol Vellum, Bazzil Basics,
PTI Kraft Cardstock, PP - October Afternoon 'Farm Fresh'
Access: PTI Half and Half Die Set, Fiskars Pinking Shears and Decorative Scissors, PTI Bakers Twine - Red, Buttons, Machine Stitching, Sponges, Dimensionals

TSG Autumn/Friendbots Release Blog Hop!!

Tuesday, October 25, 2011

It's release week here at There She Goes and today is day one of the sneak peeks!!

You guys are going to love this month's sets! Jess has put together a great set of stamps perfect for all those festive occasions right around the corner! Shall we get started?! Lets do it!


The seasons are changing and it’s time to add some rich colors and beautiful leaves to our paper crafting projects! Autumn mini set has a bunch of different leaves each with a fun pattern that you are going to love to use!

Autumn is a 3x4 set that includes a total of 13 stamps and will sell for $7.


I think you guys are going to love this mini set! It's got lots of great leaf images with fun patterns on them, so they'll jazz up all your Fall cards! I stamped a few of the large leaves onto some stiff cardstock, cut them out and layered them on this simply stated card. I didn't want the patterned paper to detract from the leaves, so I chose some dots on dots paper by Bo Bunny as the backdrop and some old paper from Cosmo Cricket's Mr Campy collection. A little paper piercing and matting later, a quick and easy card ready for the season!


~~~~~~~~~~~~~~~~~~~~~~~~~~~~~~~~~~~~~~


The other set the Trendsetters and I are previewing today is this fun, little set from one of our favorite designers, Torico!


Torico brings us the techno savvy stamp set that everyone needs. We are living in an information age on an information planet so why not surprise your Friendbots with some automated cuteness. Let’s make it the age of interfacing with all your B.F.F.s!

Friendbots is a 3x4 set that includes a total of 5 stamps and will sell for $7.

Who doesn't love cute little robots?! I grew up watching the Jetsons and they were one of my favorite cartoons as a kid! Not that it was ever on tv as much as the Flintstones....but I digress... ;)

You know I just HAD to use Cosmo Cricket's Cogsmo collection for this card, right?! I mean, how could I not? I stamped out the little robot and his friend onto some Strathmore Bristol Vellum and watercolor colored them. After I cut them out, I added some Diamond Glaze to their eyes, so they'd stand out.

Would you like to win the new Autumn / Friendbots mini stamp sets? Here is what you need to do- visit the Trendsetter’s blogs that are participating in each of the blog hop challenges below and comment on their creations as you go. One of the Trendsetter’s blogs (from each hop day) will be randomly chosen as the ‘it’ blog and a winner will be picked using a random number generator from the comments left on that Trendsetter’s Blog Hop Challenge post. You will not know which blog has been chosen so the more you comment on the better your chances are of winning new stamps! The Blog Hop Challenges will be open until 5 PM Eastern Time Saturday October 29th with the winner being announced during the release party chat.
To help you out, here's a list of blogs you'll need to visit:


Thanks so much for stopping in today! Tomorrow's sneak peek will whisk you away! ;)


Supplies:
Card 1
Stamps:
There She Goes 'Autumn'
Inks: StazOn 'Jet Black', SU's Creamy Caramel, Close To Cocoa, Chocolate Chip, Distress Inks 'Frayed Burlap'
Papers: Strathmore Bristol Vellum, Bazzil Basics, PP - Bo Bunny and Cosmo Cricket
Access: Martha Stewart Edge Punch, Paper Piercer, Dimensionals, Sponges

Card 3
Stamps:
There She Goes 'FriendBots'
Inks: StazOn 'Jet Black', SU's Buckaroo Blue, Ruby Red, Morning Marigold, Really Rust, Going Gray
Papers: Strathmore Bristol Vellum, Bazzil Basics, PP - Cosmo Cricket
Access: Fiskars Star Punch, Buttons, Spellbinders Labels Four Nestibilities, Machine Stitching, Dimensionals

Gobble! Gobble! Gobble!

Friday, October 21, 2011

Happy Friday everyone!

I, for one, am very happy it's Friday already! It hasn't been a trying week at work, but more of the mundane kind and I'm still tired from all that work I did on the cabinet project. I've been humming and ahhing over whether to add crown molding to the top of the cabinets. It would finish off the look so nicely, but it wouldn't leave me much room to put things (namely baskets) once they're up. I might take photos this weekend and have you help me decide! :)

All this week over at the There She Goes blog we've been shining the spotlight on a few older sets that are perfect for Fall. This sets are some of my favorites - Bountiful Blessings, Autum Mosaics and Gobble. There are card samples from the past, new tips and tricks PDF's that Jessica put together and today, the senior Trendsetters dug a little deeper and came up with a bunch of new cards for you to drool over!

Here's what I whipped up this week:

I used the Gobble set, together with this week's TSG126 partial image challenge and Karen's Sweet Sunday Sketch SSSC139, to create this card. I also used one of the dies from the World's Best die set to create the banner. The scalloped border was created with some decoratived scissors (my go-to tools). I colored up the sign, cut it out and then threaded it through a slit I made at the top of the turkey's hand (or should I say wing?!). I needed something to fill in the negitive space to balance out the turkey image, so I created some sky (check out my tutorial here) to create some harmony.

I was seriously craving a Day After Thanksgiving sandwich after making this card! Bring on the turkey!! :)

I hope you have a fabulous weekend, whatever it is you're doing. We're headed to the Keene Pumpkin Festival.....should be a spooky good time! ;)


Supplies
Stamps: There She Goes 'Gobble' mini set
Inks: StazOn 'Jet Black', SU's Creamy Caramel, Morning Marigold, Dusty Durango, Ruby Red, Distress Inks 'Black Soot and Vintage Photo'
Papers: Strathmore Bristol Vellum, Bazzil Basics - Bitter Chocolate, PTI Kraft cardstock, PP - MME and Sassafras Lass
Access: There She Goes 'World's Best' die set, Fiskars Decorative Scissors, PTI Rustic Button Twine, Machine Stitching, sponges, Dimensionals

You Go Girl....Card Kit!

Wednesday, October 19, 2011

I think I'm going to unofficially name these card kit posts to 'Random Card Wednesday' because every time my two girlfriends and I do a card kit together, we inevitably post our creations on a Wednesday! It's happened more times than not, so I dub thee....Random Card Wednesday! :)

This month's kit was lovingly put together by my dear friend Kadie. She obviously knew I needed a few cheers sent my way, because the stamped image she sent along is from MFT's A La Mode - All Star set!

I have been on a shopping hiatus ever since The Man restarted his career, so I have been avoiding window shopping in any of the stamp stores online. But I have seen these cuties all over blog land (darn you Blogger!) and I was soooo excited to play with one of them!

For this layout I used last week's Sweet Sunday Sketch Challenge #138 because Kadie sent along lots and lots of papers in her kit and I couldn't decide which ones to use! :) That ribbon was also from her kit and I created a little bit more thickness to it by using a edge punch and a little piece of scrap paper. Miss All Star herself was colored with my SU reinkers in Creamy Caramel for her face, Ruby Red for her pants and Not Quite Navy for her blue stripes. The sentiment was from Kraftin Kimmies Everyday Sentiments set.

Now, if you really want to see some FABULOUS cards, pop on over to my other sweet friend Mary as well as Kadie's blogs to see what they did with their kits! I know it's going to knock your socks off!


Thanks so much for popping in today!


Supplies
Stamps:
MFT's
'A La Mode - All Star', Kraftin Kimmie Stamps 'Everyday Sentiments'
Inks: StazOn 'Jet Black', Creamy Caramel, Ruby Red, Not Quite Navy, Dusty Durango, Distress Inks 'Antique Linen and Black Soot'
Papers: Bazzil Basics, PTI Kraft Cardstock, PP - Ask Kadie!
Access: Ribbon, EK Success Edge Punch, Adhesive Rhinestones, Machine Stitching, Sponges, Dimensionals

TSG125 Sketch Challenge...Happy Haunting!

Tuesday, October 11, 2011

Good Morning!

We had the most gorgeous Fall weekend ever! The weather was scorching (80deg in October is scorching for us!) and I basked in it for as long as I could stand. Actually, at one point, The Man thought I was nuts because it was so hot and I was standing in the sun, in my jeans, sanding cabinets! Even though I was overheating just a little, I couldn't bring myself to go indoors because I knew that sunshine wasn't going to stick around forever! I know some of you are with me on this one, right?? :)

This week's There She Goes Challenge TSG125 is brought to us by Trendsetter Jackie Rockwell and she has a fabulous sketch for us all!

If you got your hands on the Worlds Best Die set from the recent release, then it's going to come in handy for some of the elements on this sketch! If you didn't, then not to worry, you can easily create the same look with a pair of scissors and some circle punches.

I adore Halloween! So much so, that I usually skip decorating for Fall in September and break out my Halloween decorations instead! Fall decorations can wait until after October, as far as I'm concerned.

Which is why created a Halloween card this week - I've been in the mood for over a month now! :)

I broke out some of my coverted Graphic 45 Halloween paper from last year, as well as the Bugs and Hisses and Hauntingly Delightful sets and went to work! The banner tags and the medallion were created with the die from the Worlds Best die set. I stamped the cross onto one of them, then I added glitter to the edges of the banners by dipping them in glue first. I used my pinking shears to create the 'string' that holds up the banners. I added black buttons tied with a bit of PTI's Rustic Button Twine to add a bit of detail (and to cover up the overlap).

I sponged the base with Distress Inks (Tea Dye and Vintage Photo), then distressed the edges with my scissors, then sponged them again to get rid of the white edges. Then I matted it to some black card stock and machine stitched them together. I stamped the large cobweb from the Bugs and Hisses set in the corners and curved the Happy Haunting sentiment to mimic the 'string'. Loooove that acrylic stamps let us do that! Lastly, I stamped the little ghost from the Hauntingly Delightful set onto white cardstock, colored in his treat bag, then cut him out and popped him on the medallion with some dimensionals.

Here's a peek at what I did to the inside of the card....

Think you can do something with this sketch?? Well, here's what you need to know for this challenge...

To be eligible for the giveaway, you are to create a card using the sketch, and then go back to the TSG Blog to add your name and a link to your project in the InLinkz that is located at the bottom of the challenge post. This challenge is open until the winner has been announced on the following Monday (October 17th). The winner will get a $5 gift certificate to use in the TSG Web store!

By participating in this challenge, you may also find yourself in the Trendsetting Spotlight that shines on the TSG Blog every Thursday. We will be on the look out to find challenge cards that stand out and show Trendsetting qualities. TSG stamps are not required to participate in the challenges but are appreciated :)

You do not need to have a blog to be able to participate in the TSG Challenges! You can simply add the URL link from your project after it has been uploaded to your online craft gallery. If you upload your card to an online craft gallery, please use the keyword TSG125 so we can check out your beautiful work!

Thanks so much for stopping in today!


Supplies
Stamps:
There She Goes Bugs and Hisses, Hauntingly Delightful
Inks: StazOn 'Jet Black', SU's Going Grey and Really Rust, Distress Inks 'Tea Dye, Antique Linen Vintage Photo and Walnut Stain'
Papers: White and Black cardstock, PTI Kraft Cardstock, PP - Graphic 45
Access: TSG Worlds Best Die Set, PTI Buttons and Rustic Button Twine, Pinking Shears, Fiskars Decorative Scissors, Machine Stitching, Sponges, Dimensionals

Related Posts with Thumbnails