Thursday, January 15, 2009
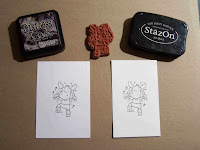 On the left we have Aerobics Riley stamped in Black Soot by Distress Inks on Georgia Pacific cardstock (found at Walmart). On the right we have Riley stamped in Staz On 'Jet Black' ink on Canson Watercolor paper. I'll be using my Hanna Stamps! Riley Copics set on the GP paper and my SU inks and aquapainter on the watercolor paper. I have found that these combinations of paper, ink and color medium work well together and do not bleed.
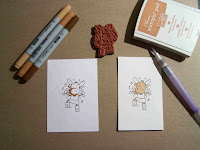 I applied my first layer of color for both images. When using the copics, I have to apply the darkest color first, so I used the E37 in all the areas that have the most shadow on Riley (my point of light/sun is coming from the top right hand corner - much like my desk lamp! LOL). With the watercolors, my first layer is an overall light wash of color (I used SU's Creamy Caramel).
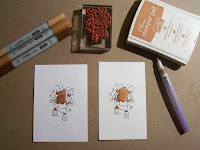 For the second round of copic coloring, I applied E35 OVER the E37 and then over most of Riley lworking in a quick, circular motion to blend the two colors together seamlessly. It's important to not let the color applied previously dry up. This helps avoid the seams between the two shades of color. With the watercolors it's the opposite - you should wait until the first layer of color is dry before you apply the next wash of color. This helps build the intensity of color on your image. So I reapplied the Creamy Caramel for the second time starting on the left side of Riley and barely leaving any color on Riley's right hand side to create a highlight on that side.
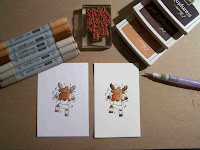 I applied E33 for the third color to just the edges of Riley that were closest to the light source, which was in my upper right hand corner. Blending as I go in a circlular motion overlapping the previously applied E35 until you see it the two colors meld into one. With the watercolors, I waited until the image was 99% dry and made sure the tip of the aquapainter brush wasn't soaking wet before applying my final layer of Creamy Caramel. This time I applied it only to the areas of shadow on Riley which are the same areas that I started with the copics (see pic 1).
I applied the W3, W2 and W1 to Riley's antlers and hooves the same way. I used Close to Cocoa and Chocolate Chip on the watercolored image for the same areas. And that's pretty much it.
Ok, here's a basic summary for you:
Copics
1. Start with the darkest color first.
2. Don't let each color dry between applications.
3. Apply lighter shade over the darker shade to blend them together.
Watercolors
1. Start with a light wash first.
2. Wait for first layer to dry then apply second wash of same color.
3. Wait for second layer to dry then apply the third layer to areas of shadow only.
Again, I'm sorry that this isn't the best tutorial around but the text does explain the process I follow each time I color an image. I hope this helps out some of you if you're wondering about the techniques and differences between the two mediums.
And now to show off the image(s). I chose to use the watercolored Riley and used this week's MOJO sketch (MOJO69) for the card layout.
 And the inside.....
 Thank you for stopping by today. I hope your week is flying by (if you're working that is). See you all tomorrow with a RILEY SURPRISE!!
Supplies:
Stamps: Hanna Stamps! 'Aerobics Riley', sentiment by Hampton Art 'PS0021'
Inks: Staz On 'Jet Black, Creamy Caramel, Close to Cocoa, Chocolate Chip, Soft Sky, Pumpkin Pie
Paper: Bazzil cs, Canson Watercolor, PP - Basic Grey 'Archaic Collection - Primal'
Access: EK Success Circle Cutter, buttons, twine, ribbon, dimensionals, decorative scissors


.gif
)


10 Comments:
Thank you so much for the tutorial. Your "rendering" is always perfection and this step by step will help those of us who are struggling in this area. And what a darling card with a sentiment that is so true! Happy Thursday!
I think your tutorial is great and I love that card! Too cute!!
I love this! Thank you so much sandra, for the tutorial! i am going to try this out!! And I SOOOOO have my eye on those riley copics!!
Sandra - this is great! I never realized that you do your watercoloring with the SU pads! mmm - more things for me to explore.
Woohoo! This is brill, Sandra!! A perfect tutorial! The card is sooo cute! :)
Great tutorial, Sandra! I love the comparison, and you did a fabulous job. I'm very interested in how the Copics work, and you sure make it look easy. Somehow I don't think it's quite that easy, though! Thanks so much for sharing your talent!!!
Brilliant tutorial!!! I have never tried the watercoloring, but you have encouraged me to give it a go. I am not too savvy when it comes to determining light sources and shading...I just color. I guess I am going to have to practice, practice, practice!!! At least I know this tutorial is here:o)
I hope your weekend is FABULOUS!!! Is this your Friday off? I hope it is, and you enjoy it to the max!!!
Love and Hugs!
Carolyn
What a great comparison! I love your tips too! I usually apply the light color first when I use the copics, but I like your results so I am definitly going to give your way a try. I mean, you color so beautifully so that must be the trick!! Seriously I love your work and truly admire your talent!
Smiles,
janna
What a great tutorial lesson! You are definitely able to teach us novices in a way that's understandable and exciting! YAY for DT San!!
Sandra, I'm a little behind in checking out your blog lately but impressed as usual. Thank you so much for the great tutorial. That is really helpful. Just hope I can put it to use. LOL!!
Post a Comment